Nexus Developer Experience - Java SDK feature guide
Use Temporal Nexus to connect Temporal Applications within and across Namespaces using a Nexus Endpoint, a Nexus Service contract, and Nexus Operations.
New to Nexus? Start with the Nexus Java Quickstart.
This page shows how to do the following:
- Run a development Temporal Service with Nexus enabled
- Create caller and handler Namespaces
- Create a Nexus Endpoint to route requests from caller to handler
- Define the Nexus Service contract
- Develop a Nexus Service and Operation handlers
- Develop a caller Workflow that uses a Nexus Service
- Make Nexus calls across Namespaces with a development Server
- Make Nexus calls across Namespaces in Temporal Cloud
This documentation uses source code derived from the Java Nexus sample.
Run the Temporal Development Server with Nexus enabled
Prerequisites:
- Install the latest Temporal CLI (v1.3.0 or higher recommended)
- Install the latest Temporal Java SDK (v1.28.0 or higher recommended)
The first step in working with Temporal Nexus involves starting a Temporal server with Nexus enabled.
temporal server start-dev
This command automatically starts the Temporal development server with the Web UI, and creates the default Namespace.
It uses an in-memory database, so do not use it for real use cases.
The Temporal Web UI should now be accessible at http://localhost:8233, and the Temporal Server
should now be available for client connections on localhost:7233.
Create caller and handler Namespaces
Before setting up Nexus endpoints, create separate Namespaces for the caller and handler.
temporal operator namespace create --namespace my-target-namespace
temporal operator namespace create --namespace my-caller-namespace
my-target-namespace will contain the Nexus Operation handler, and we will use a Workflow in my-caller-namespace to
call that Operation handler. We use different namespaces to demonstrate cross-Namespace Nexus calls.
Create a Nexus Endpoint to route requests from caller to handler
After establishing caller and handler Namespaces, the next step is to create a Nexus Endpoint to route requests.
temporal operator nexus endpoint create \
  --name my-nexus-endpoint-name \
  --target-namespace my-target-namespace \
  --target-task-queue my-handler-task-queue
You can also use the Web UI to create the Namespaces and Nexus endpoint.
Define the Nexus Service contract
Defining a clear contract for the Nexus Service is crucial for smooth communication.
In this example, there is a service package that describes the Service and Operation names along with input/output types for caller Workflows to use the Nexus Endpoint.
You can hand-write that package, but the preferred way is to generate it with the Nexus Code Generator.
You write the contract once as a JSON definition file and run nexgen against it, and it emits the typed models,
runtime validators, and the Service definition itself.
This is what makes a Nexus Service polyglot. Both sides generate from the same definition file: the handler implements the Service, the caller invokes its Operations, and neither hand-writes a request or response type. A Python handler and a Go caller share no code, but they both run off that same service contract - so they interoperate with no coordination between the teams beyond the contract itself.
The generated validators check every payload against the contract, when a value is parsed off the wire and again when
it is serialized onto it, so bad data is rejected at the boundary rather than reaching your Workflow. A value validates
identically in every language, which is what lets a caller and a handler written in different languages trust the same
contract. See the chat.nexusrpc.yaml
sample contract and the Definition files section of the
nexgen README for the file format.
Develop a Nexus Service and Operation handlers
Nexus Operation handlers are typically defined in the same Worker as the underlying Temporal primitives they abstract. Operation handlers can decide if a given Nexus Operation will be synchronous or asynchronous. They can invoke underlying Temporal primitives such as a Query, Signal, or Update using the Temporal SDK Client, or run other reliable code. Use a synchronous Nexus Operation only when its complete execution path is highly reliable, has predictably low latency, and finishes well within the 10-second handler deadline. Use an asynchronous Nexus Operation when latency or availability is uncertain, the work might exceed the handler deadline, or execution depends on a potentially unreliable service or database. Handlers should be reliable since the circuit breaker trips after 5 consecutive retryable errors, blocking all Operations from the caller to that Endpoint.
Every Operation is written with TemporalOperationHandler. TemporalOperationHandler.create(...) hands your start handler three things: a context, a Client, and the
Operation input. What you do with the Client decides what backs the Operation:
- Synchronous. Return
TemporalOperationResult.sync(...)and the Operation completes during the handler call. The caller has its result as soon as the call returns. - Asynchronous. Call
startWorkflow,startActivity, orstartWorkflowUpdateon the Client. The handler returns as soon as that Execution has started, and the Operation stays open until the Execution finishes, which may be days later. Its result is delivered to the caller through the Nexus completion callback. This is what lets an Operation outlive the Nexus request timeout.
A handler can perform any number of synchronous side effects, such as sending a Signal, but at most one asynchronous backing per invocation.
Develop a Synchronous Nexus Operation handler
Return a synchronous result when the Operation can answer immediately. The handler computes the answer and returns it, and the Operation completes during the call.
Handlers should be reliable to avoid tripping the circuit breaker, and the whole call has to finish inside the Nexus request timeout.
@ServiceImpl(service = SampleNexusService.class)
public class SampleNexusServiceImpl {

  @OperationImpl
  public OperationHandler<SampleNexusService.EchoInput, SampleNexusService.EchoOutput> echo() {
    return TemporalOperationHandler.create(
        (ctx, client, input) ->
            TemporalOperationResult.sync(new SampleNexusService.EchoOutput(input.getMessage())));
  }
}
Use the Temporal Client for Signals, Queries, and Updates
A common pattern is to reach a Workflow that is already running. Query it or Signal it from a synchronous Operation, or use Signal-With-Start to make sure the Workflow exists before the Signal arrives. Those calls complete during the handler call, so they have to finish inside the Nexus request timeout.
Updates are the exception. Do not wait for one inside the handler. Start it with startWorkflowUpdate and it backs the
Operation. The handler returns straight away, and the Operation completes when the Update does, however long it takes.
The nexus_messaging sample shows a Nexus Service that Queries and Signals a running Workflow from synchronous Operations, and backs an Operation with a Workflow Update.
The Client your handler receives is not an ordinary Temporal Client. It propagates bidirectional links and request Ids on every call, so the caller-side and handler-side Executions are connected in the UI without wiring anything. Reach the Workflow Client through it rather than constructing your own.
In this example the Workflow Id is derived from an identifier carried in the Operation input, so the caller only needs the identifier it cares about:
@OperationImpl
public OperationHandler<ApproveInput, ApproveOutput> approve() {
  return TemporalOperationHandler.create(
      (ctx, client, input) -> {
        client
            .getWorkflowClient()
            .newWorkflowStub(GreetingWorkflow.class, "GreetingWorkflow_for_" + input.getUserId())
            .approve(input);
        return TemporalOperationResult.sync(new ApproveOutput());
      });
}
There are two examples of messaging through Nexus in the sample code, caller pattern and on-demand pattern. The caller pattern shows how to send messages to an existing Workflow, while the on-demand pattern shows how to start a Workflow through Nexus and then send Signals to it.
Develop an Asynchronous Nexus Operation handler to start a Workflow
Call startWorkflow on the Client. The Operation completes when the Workflow returns, and the Workflow's return
value is delivered to the caller as the Operation's result.
@OperationImpl
public OperationHandler<SampleNexusService.HelloInput, SampleNexusService.HelloOutput> hello() {
  return TemporalOperationHandler.create(
      (ctx, client, input) ->
          client.startWorkflow(
              HelloHandlerWorkflow.class,
              HelloHandlerWorkflow::hello,
              input,
              WorkflowOptions.newBuilder()
                  .setWorkflowId(
                      String.format(
                          "hello-%s-%s",
                          input.getName(), input.getLanguage().name().toLowerCase(Locale.ROOT)))
                  .build()));
}
Workflow IDs should typically be business-meaningful IDs and are used to dedupe Workflow starts. In general, the ID should be passed in the Operation input as part of the Nexus Service contract.
Attach multiple Nexus callers to a handler Workflow with a Conflict-Policy of Use-Existing.
Map a Nexus Operation input to multiple Workflow arguments
A Nexus Operation can only take one input parameter. To start a Workflow that takes several, pass the arguments
directly to startWorkflow between the method reference and the Workflow options:
@OperationImpl
public OperationHandler<SampleNexusService.HelloInput, SampleNexusService.HelloOutput> hello() {
  return TemporalOperationHandler.create(
      (ctx, client, input) ->
          client.startWorkflow(
              HelloHandlerWorkflow.class,
              HelloHandlerWorkflow::hello,
              input.getName(),
              input.getLanguage(),
              WorkflowOptions.newBuilder()
                  .setWorkflowId("hello-" + input.getName())
                  .build()));
}
Register a Nexus Service in a Worker
After developing an asynchronous Nexus Operation handler to start a Workflow, the next step is to register a Nexus Service in a Worker.
core/src/main/java/io/temporal/samples/nexus/handler/HandlerWorker.java
package io.temporal.samples.nexus.handler;

import io.temporal.client.WorkflowClient;
import io.temporal.samples.nexus.options.ClientOptions;
import io.temporal.worker.Worker;
import io.temporal.worker.WorkerFactory;

public class HandlerWorker {
  public static final String DEFAULT_TASK_QUEUE_NAME = "my-handler-task-queue";

  public static void main(String[] args) {
    WorkflowClient client = ClientOptions.getWorkflowClient(args);

    WorkerFactory factory = WorkerFactory.newInstance(client);

    Worker worker = factory.newWorker(DEFAULT_TASK_QUEUE_NAME);
    worker.registerWorkflowImplementationTypes(HelloHandlerWorkflowImpl.class);
    worker.registerNexusServiceImplementation(new SampleNexusServiceImpl());

    factory.start();
  }
}
Develop a caller Workflow that uses the Nexus Service
Import the Service API package that has the necessary service and operation names and input/output types to execute a Nexus Operation from the caller Workflow:
core/src/main/java/io/temporal/samples/nexus/caller/EchoCallerWorkflowImpl.java
package io.temporal.samples.nexus.caller;

import io.temporal.samples.nexus.service.SampleNexusService;
import io.temporal.workflow.NexusOperationOptions;
import io.temporal.workflow.NexusServiceOptions;
import io.temporal.workflow.Workflow;
import java.time.Duration;

public class EchoCallerWorkflowImpl implements EchoCallerWorkflow {
  SampleNexusService sampleNexusService =
      Workflow.newNexusServiceStub(
          SampleNexusService.class,
          NexusServiceOptions.newBuilder()
              .setOperationOptions(
                  NexusOperationOptions.newBuilder()
                      .setScheduleToCloseTimeout(Duration.ofSeconds(10))
                      .build())
              .build());

  @Override
  public String echo(String message) {
    return sampleNexusService.echo(new SampleNexusService.EchoInput(message)).getMessage();
  }
}
core/src/main/java/io/temporal/samples/nexus/caller/HelloCallerWorkflowImpl.java
package io.temporal.samples.nexus.caller;

import io.temporal.samples.nexus.service.SampleNexusService;
import io.temporal.workflow.NexusOperationHandle;
import io.temporal.workflow.NexusOperationOptions;
import io.temporal.workflow.NexusServiceOptions;
import io.temporal.workflow.Workflow;
import java.time.Duration;

public class HelloCallerWorkflowImpl implements HelloCallerWorkflow {
  SampleNexusService sampleNexusService =
      Workflow.newNexusServiceStub(
          SampleNexusService.class,
          NexusServiceOptions.newBuilder()
              .setOperationOptions(
                  NexusOperationOptions.newBuilder()
                      .setScheduleToCloseTimeout(Duration.ofSeconds(10))
                      .build())
              .build());

  @Override
  public String hello(String message, SampleNexusService.Language language) {
    NexusOperationHandle<SampleNexusService.HelloOutput> handle =
        Workflow.startNexusOperation(
            sampleNexusService::hello, new SampleNexusService.HelloInput(message, language));
    // Optionally wait for the operation to be started. NexusOperationExecution will contain the
    // operation token in case this operation is asynchronous.
    handle.getExecution().get();
    return handle.getResult().get().getMessage();
  }
}
Register the caller Workflow in a Worker
After developing the caller Workflow, the next step is to register it with a Worker.
core/src/main/java/io/temporal/samples/nexus/caller/CallerWorker.java
package io.temporal.samples.nexus.caller;

import io.temporal.client.WorkflowClient;
import io.temporal.samples.nexus.options.ClientOptions;
import io.temporal.worker.Worker;
import io.temporal.worker.WorkerFactory;
import io.temporal.worker.WorkflowImplementationOptions;
import io.temporal.workflow.NexusServiceOptions;
import java.util.Collections;

public class CallerWorker {
  public static final String DEFAULT_TASK_QUEUE_NAME = "my-caller-workflow-task-queue";

  public static void main(String[] args) {
    WorkflowClient client = ClientOptions.getWorkflowClient(args);

    WorkerFactory factory = WorkerFactory.newInstance(client);

    Worker worker = factory.newWorker(DEFAULT_TASK_QUEUE_NAME);
    worker.registerWorkflowImplementationTypes(
        WorkflowImplementationOptions.newBuilder()
            .setNexusServiceOptions(
                Collections.singletonMap(
                    "SampleNexusService",
                    NexusServiceOptions.newBuilder().setEndpoint("my-nexus-endpoint-name").build()))
            .build(),
        EchoCallerWorkflowImpl.class,
        HelloCallerWorkflowImpl.class);

    factory.start();
  }
}
Develop a starter to start the caller Workflow
To initiate the caller Workflow, a starter program is used.
core/src/main/java/io/temporal/samples/nexus/caller/CallerStarter.java
package io.temporal.samples.nexus.caller;

import io.temporal.api.common.v1.WorkflowExecution;
import io.temporal.client.WorkflowClient;
import io.temporal.client.WorkflowOptions;
import io.temporal.samples.nexus.options.ClientOptions;
import io.temporal.samples.nexus.service.SampleNexusService;
import org.slf4j.Logger;
import org.slf4j.LoggerFactory;

public class CallerStarter {
  private static final Logger logger = LoggerFactory.getLogger(CallerStarter.class);

  public static void main(String[] args) {
    WorkflowClient client = ClientOptions.getWorkflowClient(args);

    WorkflowOptions workflowOptions =
        WorkflowOptions.newBuilder().setTaskQueue(CallerWorker.DEFAULT_TASK_QUEUE_NAME).build();
    EchoCallerWorkflow echoWorkflow =
        client.newWorkflowStub(EchoCallerWorkflow.class, workflowOptions);
    WorkflowExecution execution = WorkflowClient.start(echoWorkflow::echo, "Nexus Echo 👋");
    logger.info(
        "Started EchoCallerWorkflow workflowId: {} runId: {}",
        execution.getWorkflowId(),
        execution.getRunId());
    logger.info("Workflow result: {}", echoWorkflow.echo("Nexus Echo 👋"));
    HelloCallerWorkflow helloWorkflow =
        client.newWorkflowStub(HelloCallerWorkflow.class, workflowOptions);
    execution = WorkflowClient.start(helloWorkflow::hello, "Nexus", SampleNexusService.Language.EN);
    logger.info(
        "Started HelloCallerWorkflow workflowId: {} runId: {}",
        execution.getWorkflowId(),
        execution.getRunId());
    logger.info("Workflow result: {}", helloWorkflow.hello("Nexus", SampleNexusService.Language.ES));
  }
}
Make Nexus calls across Namespaces with a development Server
Follow the steps below to run the Nexus handler Worker, the Nexus caller Worker, and the starter app.
Run Workers connected to a local development server
Run the Nexus handler Worker:
./gradlew -q execute -PmainClass=io.temporal.samples.nexus.handler.HandlerWorker \
    --args="-target-host localhost:7233 -namespace my-target-namespace"
In another terminal window, run the Nexus caller Worker:
./gradlew -q execute -PmainClass=io.temporal.samples.nexus.caller.CallerWorker \
    --args="-target-host localhost:7233 -namespace my-caller-namespace"
Start a caller Workflow
With the Workers running, the final step in the local development process is to start a caller Workflow.
Run the starter:
./gradlew -q execute -PmainClass=io.temporal.samples.nexus.caller.CallerStarter \
    --args="-target-host localhost:7233 -namespace my-caller-namespace"
This will result in:
[main] INFO  i.t.s.nexus.caller.CallerStarter - Started workflow workflowId: 9b3de8ba-28ae-42fb-8087-bdedf4cecd39 runId: 404a2529-764d-4d1d-9de5-8a9475e40fba
[main] INFO  i.t.s.nexus.caller.CallerStarter - Workflow result: Nexus Echo 👋
[main] INFO  i.t.s.nexus.caller.CallerStarter - Started workflow workflowId: 9cb29897-356a-4714-87b7-aa2f00784a46 runId: 7e71e62a-db50-49da-b081-24b61016a0fc
[main] INFO  i.t.s.nexus.caller.CallerStarter - Workflow result: ¡Hola! Nexus 👋
Canceling a Nexus Operation
To cancel a Nexus Operation from within a Workflow, create a CancellationScope using the
Workflow.newCancellationScope API. Workflow.newCancellationScope takes a Runnable. Any SDK methods started in this
runnable, such as Nexus operations, will be associated with this scope. Workflow.newCancellationScope returns a new
scope that, when the cancel() method is called, cancels the context and any SDK method that was started in the scope.
The promise returned by Workflow.startNexusOperation is resolved when the operation finishes, whether it succeeds,
fails, times out, or is canceled.
Only asynchronous operations can be canceled in Nexus, as cancelation is sent using an operation token. The Workflow or other resources backing the operation may choose to ignore the cancelation request. If ignored, the operation may enter a terminal state.
When a Nexus operation is started the caller can specify different cancellation types that will control how the caller reacts to cancellation:
ABANDON- Do not request cancellation of the operation.TRY_CANCEL- Initiate a cancellation request and immediately report cancellation to the caller. Note that this type doesn't guarantee that cancellation is delivered to the operation handler if the caller exits before the delivery is done.WAIT_REQUESTED- Request cancellation of the operation and wait for confirmation that the request was received. Doesn't wait for actual cancellation.WAIT_COMPLETED- Wait for operation completion. Operation may or may not complete as cancelled.
The default is WAIT_COMPLETED. Users can set a different option on the NexusServiceOptions by calling
.setCancellationType() on NexusServiceOptions.Builder.
Once the caller Workflow completes, the caller's Nexus Machinery stops attempting to cancel operations that have not yet been canceled, letting them run to completion.
It's okay to leave operations running in some use cases. To ensure cancelations are delivered, wait for all pending operations to deliver their cancellation requests before exiting the Workflow.
See the Nexus cancelation sample for reference.
Make Nexus calls across Namespaces in Temporal Cloud
This section assumes you are already familiar with
how connect a Worker to Temporal Cloud. The same
source code is used in this section, but the tcld CLI will
be used to create Namespaces and the Nexus Endpoint, and mTLS client certificates will be used to securely connect the
caller and handler Workers to their respective Temporal Cloud Namespaces.
Install the latest tcld CLI and generate certificates
To install the latest version of the tcld CLI, run the following command (on MacOS):
brew install temporalio/brew/tcld
If you don't already have certificates, you can generate them for mTLS Worker authentication using the command below:
tcld gen ca --org $YOUR_ORG_NAME --validity-period 1y --ca-cert ca.pem --ca-key ca.key
These certificates will be valid for one year.
Create caller and handler Namespaces
Before deploying to Temporal Cloud, ensure that the appropriate Namespaces are created for both the caller and handler. If you already have these Namespaces, you don't need to do this.
tcld login

tcld namespace create \
	--namespace <your-caller-namespace> \
	--cloud-provider aws \
	--region us-west-2 \
	--ca-certificate-file 'path/to/your/ca.pem' \
	--retention-days 1

tcld namespace create \
	--namespace <your-target-namespace> \
	--cloud-provider aws \
	--region us-west-2 \
	--ca-certificate-file 'path/to/your/ca.pem' \
	--retention-days 1
Alternatively, you can create Namespaces through the UI: https://cloud.temporal.io/Namespaces.
Create a Nexus Endpoint to route requests from caller to handler
To create a Nexus Endpoint you must have a Developer account role or higher, and have NamespaceAdmin permission on the
--target-namespace.
tcld nexus endpoint create \
  --name <my-nexus-endpoint-name> \
  --target-task-queue my-handler-task-queue \
  --target-namespace <my-target-namespace.account> \
  --allow-namespace <my-caller-namespace.account> \
  --description-file ./core/src/main/java/io/temporal/samples/nexus/service/description.md
The --allow-namespace is used to build an Endpoint allowlist of caller Namespaces that can use the Nexus Endpoint, as
described in Runtime Access Control.
Alternatively, you can create a Nexus Endpoint through the UI: https://cloud.temporal.io/nexus.
Run Workers Connected to Temporal Cloud
Run the handler Worker:
./gradlew -q execute -PmainClass=io.temporal.samples.nexus.handler.HandlerWorker \
  --args="-target-host <your-target-namespace.account>.tmprl.cloud:7233 \
  -namespace <your-target-namespace.account> \
  -client-cert 'path/to/your/ca.pem' \
  -client-key 'path/to/your/ca.key'"
Run the caller Worker:
./gradlew -q execute -PmainClass=io.temporal.samples.nexus.caller.CallerWorker \
  --args="-target-host <your-caller-namespace.account>.tmprl.cloud:7233 \
  -namespace <your-caller-namespace.account> \
  -client-cert 'path/to/your/ca.pem' \
  -client-key 'path/to/your/ca.key'"
Start a caller Workflow
./gradlew -q execute -PmainClass=io.temporal.samples.nexus.caller.CallerStarter \
  --args="-target-host <your-caller-namespace.account>.tmprl.cloud:7233 \
  -namespace <your-caller-namespace.account> \
  -client-cert 'path/to/your/ca.pem' \
  -client-key 'path/to/your/ca.key'"
This will result in:
[main] INFO  i.t.s.nexus.caller.CallerStarter - Started workflow workflowId: 9b3de8ba-28ae-42fb-8087-bdedf4cecd39 runId: 404a2529-764d-4d1d-9de5-8a9475e40fba
[main] INFO  i.t.s.nexus.caller.CallerStarter - Workflow result: Nexus Echo 👋
[main] INFO  i.t.s.nexus.caller.CallerStarter - Started workflow workflowId: 9cb29897-356a-4714-87b7-aa2f00784a46 runId: 7e71e62a-db50-49da-b081-24b61016a0fc
[main] INFO  i.t.s.nexus.caller.CallerStarter - Workflow result: ¡Hola! Nexus 👋
Observability
Web UI
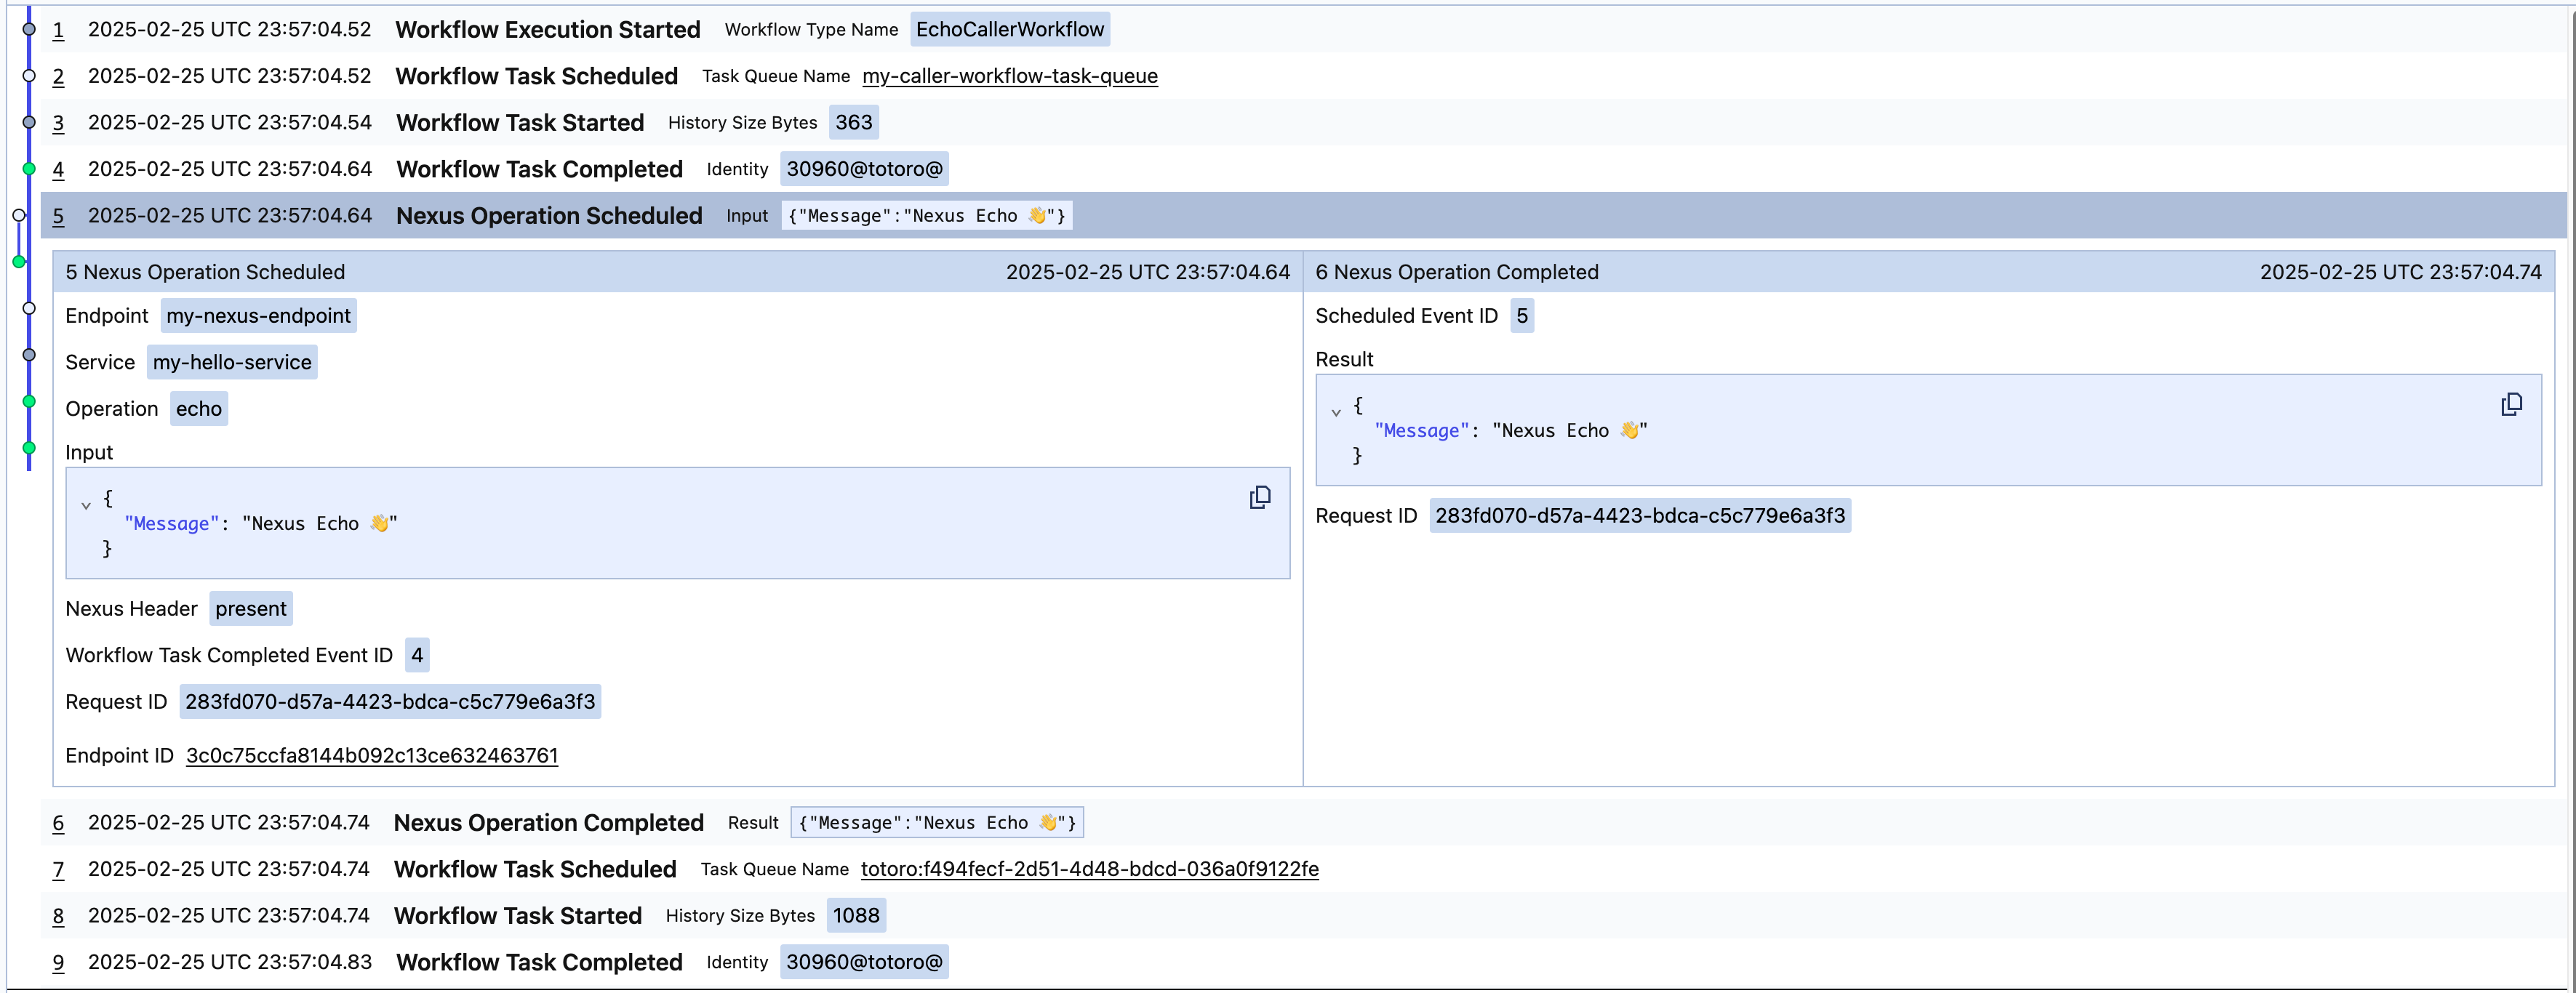
A synchronous Nexus Operation will surface in the caller Workflow as follows, with just NexusOperationScheduled and
NexusOperationCompleted events in the caller's Event history:
Observability Sync
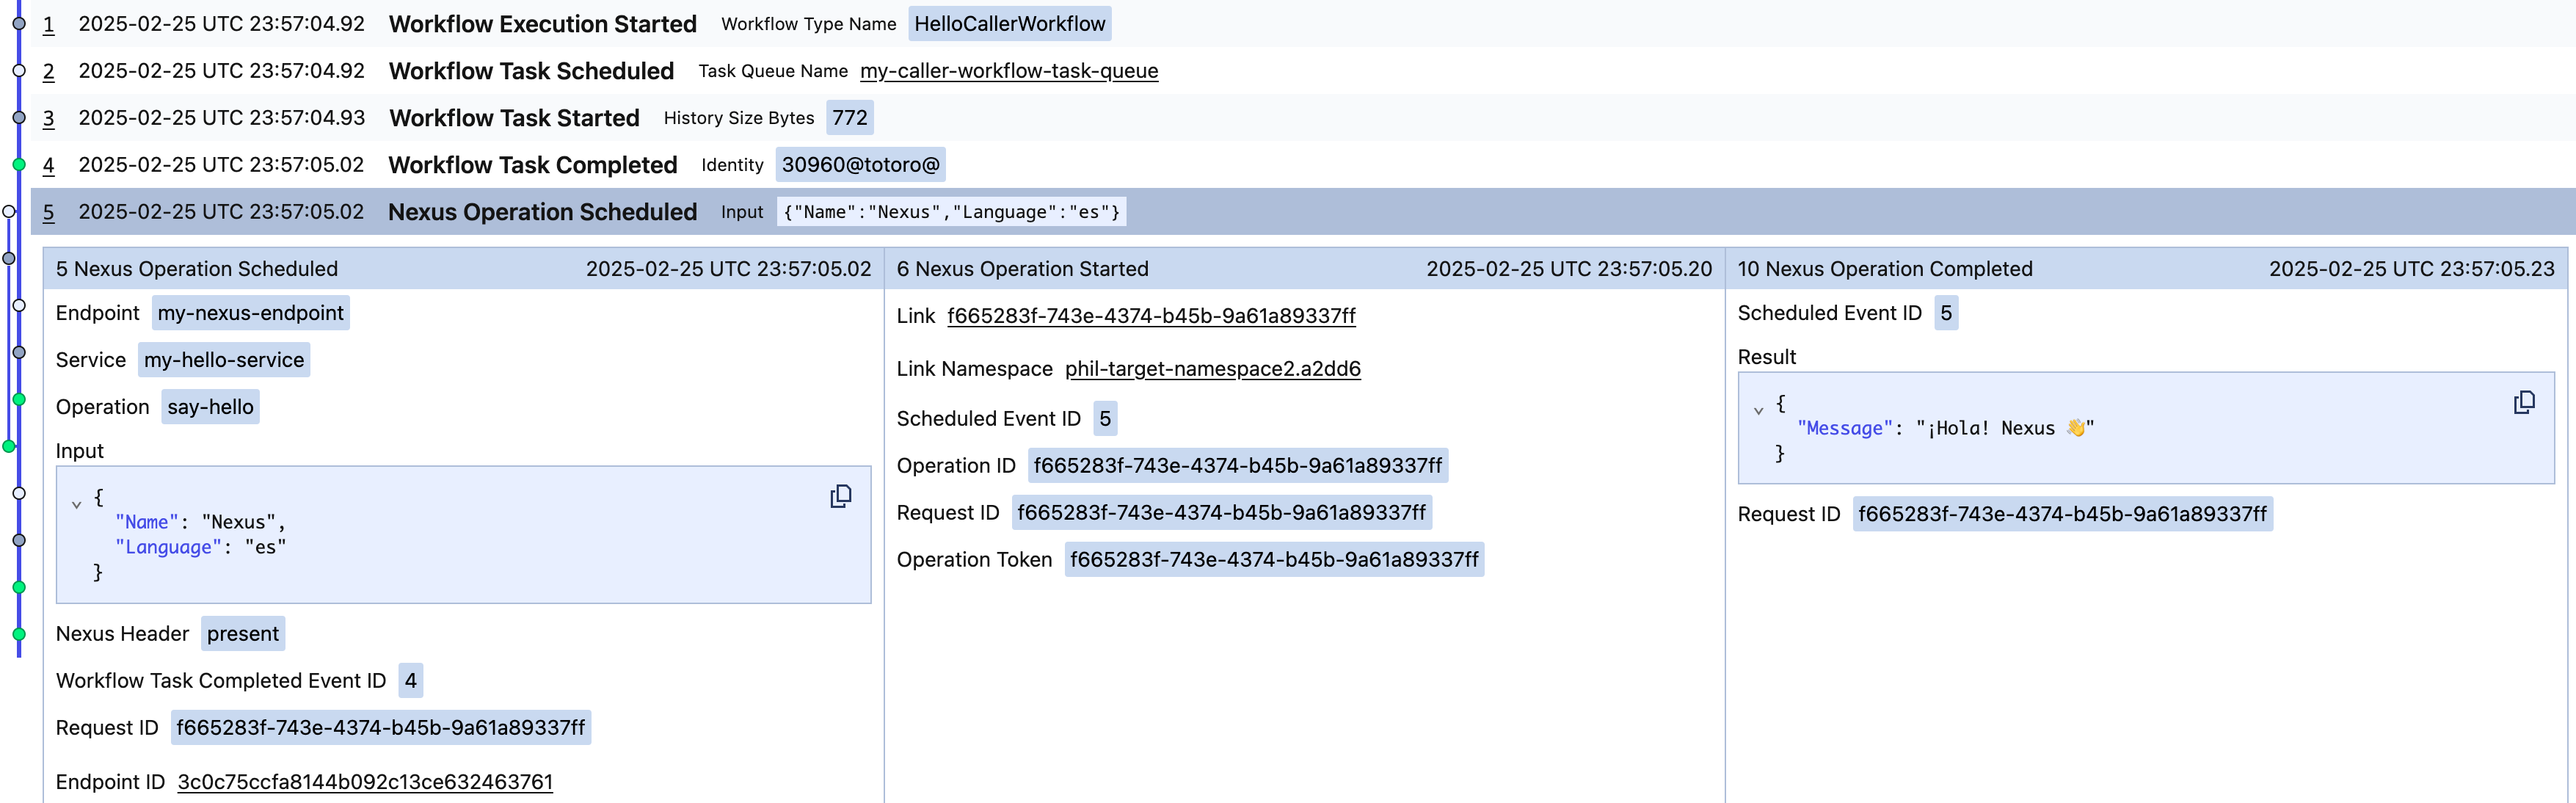
An asynchronous Nexus Operation will surface in the caller Workflow as follows, with NexusOperationScheduled,
NexusOperationStarted, and NexusOperationCompleted, in the caller's Event history:
Observability Async
Temporal CLI
Use the workflow describe command to show pending Nexus Operations in the caller Workflow and any attached callbacks
on the handler Workflow:
temporal workflow describe -w <ID>
Nexus events are included in the caller's Event history:
temporal workflow show -w <ID>
For asynchronous Nexus Operations the following are reported in the caller's history:
NexusOperationScheduledNexusOperationStartedNexusOperationCompleted
For synchronous Nexus Operations the following are reported in the caller's history:
NexusOperationScheduledNexusOperationCompleted
NexusOperationStarted isn't reported in the caller's history for synchronous operations.
Learn more
- Read the high-level description of the Temporal Nexus feature and watch the Nexus keynote and demo.
- Learn how Nexus works in the Nexus deep dive talk and Encyclopedia.
- Deploy Nexus Endpoints in production with Temporal Cloud.